• Em Destaque

    Aqui Você Encontra Os Melhores Template da Internet .

  • Em Destaque

    Aqui Você Encontra Os Melhores Template da Internet .

  • Em Destaque

    Aqui Você Encontra Os Melhores Template da Internet .

  • Em Destaque

    Aqui Você Encontra Os Melhores Template da Internet .

  • Curte aí!

    Monday, 5 March 2012

    The Under Lap
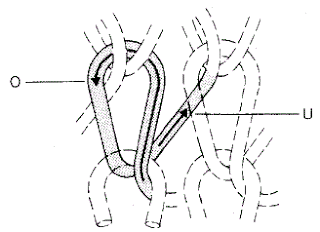
    The underlap shog occurs across the side of the needles remote from the hooks on the front of single-needle bar, and in the centre of double-needle bar, warp knitting machines. It supplies the warp yarn between one overlap and the next (Fig.A).The underlap shog generally ranges from 0 to 3 needle spaces, but it might be 14 needle spaces or more depending upon the design of the machine and the fabric structure (although efficiency and production speed will be correspondingly reduced with long underlaps).
    A.Under lap shog
    Underlaps as well as overlaps are essential in warp knitted structures in order to join the wales of loops together but they may be contributed by different guide bars.

    The Closed Lap
    A closed lap is produced when a subsequent underlap shogs in the opposite direction to the preceding overlap, thus lapping the same yarn around the back as well as around the front of the needle (Fig.B).

    B.Closed Lap
    The Open Lap
    An open lap is produced either when a subsequent underlap is in the same direction as the preceding overlap (Fig.C) or an underlap is omitted so that the overlap of the next knitting cycle commences in the needle space where the previous overlap finished. Closed laps are heavier, more compact, more opaque, and less extensible than open laps produced from the same yarn at a comparable knitting quality. 
    C.Open Lap

    Introduction of Under Lap | Closed Lap | Open Lap

    Posted at  16:29  |  in  Weft Knitting  |  Continue lendo ...»

    The Under Lap
    The underlap shog occurs across the side of the needles remote from the hooks on the front of single-needle bar, and in the centre of double-needle bar, warp knitting machines. It supplies the warp yarn between one overlap and the next (Fig.A).The underlap shog generally ranges from 0 to 3 needle spaces, but it might be 14 needle spaces or more depending upon the design of the machine and the fabric structure (although efficiency and production speed will be correspondingly reduced with long underlaps).
    A.Under lap shog
    Underlaps as well as overlaps are essential in warp knitted structures in order to join the wales of loops together but they may be contributed by different guide bars.

    The Closed Lap
    A closed lap is produced when a subsequent underlap shogs in the opposite direction to the preceding overlap, thus lapping the same yarn around the back as well as around the front of the needle (Fig.B).

    B.Closed Lap
    The Open Lap
    An open lap is produced either when a subsequent underlap is in the same direction as the preceding overlap (Fig.C) or an underlap is omitted so that the overlap of the next knitting cycle commences in the needle space where the previous overlap finished. Closed laps are heavier, more compact, more opaque, and less extensible than open laps produced from the same yarn at a comparable knitting quality. 
    C.Open Lap

    The Main Parts of the Bearded Needle

    There are five main parts of the bearded needle (Fig:A):

    1 The stem, around which the needle loop is formed.

    2 The head, where the stem is turned into a hook to draw the new loop through the old loop.

    3 The beard, which is the curved downwards continuation of the hook that is used to separate the trapped new loop inside from the old loop as it slides off the needle beard.

    4 The eye, or groove, cut in the stem to receive the pointed tip of the beard when it is pressed, thus enclosing the new loop.

    5 The shank, which may be bent for individual location in the machine or cast with others in a metal ‘lead’.

      Fig. A:  Main parts of the bearded needle.

    Main Parts of the Bearded Needle

    Posted at  14:09  |  in  regular  |  Continue lendo ...»

    The Main Parts of the Bearded Needle

    There are five main parts of the bearded needle (Fig:A):

    1 The stem, around which the needle loop is formed.

    2 The head, where the stem is turned into a hook to draw the new loop through the old loop.

    3 The beard, which is the curved downwards continuation of the hook that is used to separate the trapped new loop inside from the old loop as it slides off the needle beard.

    4 The eye, or groove, cut in the stem to receive the pointed tip of the beard when it is pressed, thus enclosing the new loop.

    5 The shank, which may be bent for individual location in the machine or cast with others in a metal ‘lead’.

      Fig. A:  Main parts of the bearded needle.

    Introduction of Wool
    Wool exhibits by nature a pronounced yellow color and also on exposure to light , alkali or by microbial degradation. Commercially, wool bleaching is carried out using either an oxidative or a reductive system, or a combined oxidation/reduction process. Oxidative bleaching in the dyebath is also possible .

    In general, oxidative bleaching with hydrogen peroxide gives superior whiteness over reductive methods..Recent research also revealed the use enzymes to enhance the whiteness of bleached wool.

    Wool cannot be bleached with sodium hypochlorite solutions, as for cotton, since it is extensively damaged to the point at which it even dissolves in the solution.

    Oxidative Bleaching Method
    A batch treatment with hydrogen peroxide is used for most bleaching applications.An activator (eg an alkali) is normally added to increase the rate of bleaching. Typically, wool is bleached at pH 8–9 for 1 h at 60◦C with a stabilized solution of hydrogen peroxide (0.75% w/w). It is generally accepted that, under alkaline conditions, the active bleaching species is the perhydroxy anion (OOH− ), the formation of which is encouraged by higher pH .

    Peroxide bleaching of wool under mild acidic conditions (pH 5–6) can also be carried out using a peracid activator such as Prestogen W (BASF) or citric acid . As wool sustains some damage in the presence of alkali, this method is useful for bleaching delicate fabrics.

    An undesirable side effect is the rapid decomposition of hydrogen peroxide to water and oxygen, a reaction catalyzed by transition-metal ions. A stabilizer, which sequesters these ions, is used to prevent this side reaction occurring. The most common stabilizers for alkaline wool bleaching are phosphates, particularly tetrasodium pyrophosphate. However, recent concerns over phosphates in effluents from textile treatment have led to the development of alternative stabilizers based on silicates .

    Heavily pigmented fibers, such as Karakul wools, require a more severe approach known as mordant bleaching. In this method, the wool is treated with a metal salt and then with hydrogen peroxide. In the first step, the melanin pigment in the wool preferentially absorbs the metal cations; and in the second step, the cations catalytically decompose the peroxide to produce highly aggressive hydroxyl free radicals, which selectively attack and bleach the melanin.

    Reductive Bleaching
    The two most popular chemicals used for reductive bleaching of wool are stabilized sodium dithionite and thiourea dioxide. Most reductive bleaching of wool is carried out using stabilized dithionite (2–5g/L) at pH 5.5–6 and 45–65◦C for 1 h. Thiourea dioxide is more expensive than sodium dithionite, but is an effective bleach when applied (1–3 g/L) at 80◦C and pH 7 for 1 h. Whiter fabrics are produced when oxidative bleaching is followed by a reductive process—this is often referred to as “full bleaching.”

    Reductive Bleaching with Sulfur Dioxide
    In the early days sulfur dioxide was used to bleach wool , but disadvantage of this method of bleaching wool was that the white was not permanent when exposed to sun and air.

    Disadvantage of reductive bleaching with hydro
    1.It tends to part harsh handle to wool.
    2.Reducing agents tend to break cystine cross links in protien fibers.

    Full Bleaching Of Wool
    However, with even the best oxidative bleaching processes, there is a limit to the whiteness that may be achieved on wool, within the limits of acceptable fibre damage.Whiter fabrics are produced when oxidative bleaching is followed by a reductive process(combined oxidative/reductive bleaching treatments)—this is often referred to as “full bleaching.”

    Shrink Resistance Treatment of Wool
    Felting in garments and fabrics that leads to excessive shrinkage is, however, undesirable. It occurs when the wet material is subjected to severe mechanical action, for example, in laundering or tumble drying . Shrink-resist treatments are directed at preventing felting shrinkage, whereas minimization of relaxation shrinkage requires careful control during fabric finishing.

    The term shrink-resistant is preferred to “shrinkproofed,Shrink resist treatment of wool adds consumer desired properties to this superior natural fibre, the improved processing technology allows processors and retailers to offer fabrics and garments with added value and performance. The improved performance offered by the Total Easy Care range of processes includes machine washability and tumble dry qualities.

    Principle of SR Treatment
    A variety of methods produce wool fabrics that withstand repeated washing without shrinkage and felting. They are particularly important for knitted woollens and worsted fabrics. 
    Two main principles are used:
    (1) modification of the scale structure of the fibre cuticle to decrease the directional friction effect – this can be achieved by chemical treatments that either partially remove the scales or cover them with a smooth film of polymer;

    (2) reduction of fibre mobility by adhesion of fibres and yarns at their points of contact and by decreasing fibre elasticity by means of intermolecular crosslinking.

    Chlorine SR Treatment
    Chlorine-Based Shrink-Resist Treatments. The principal oxidizing agent used in degradative shrink-resist treatments is chlorine. Free chlorine reacts very rapidly with wool; hence, it is difficult to treat a mass of wool fibers evenly. Two different types of chlorination methods are used commercially: continuous treatment and batch treatment. In the continuous method, top or loose wool is reacted with an aqueous solution of chlorine gas for a short time (
    Chlorine Free SR treatment
    Chlorine-Free Shrink-Resist Treatments. Commercially, the only other oxidizing agent used to any extent is permonosulfuric acid (PMS; HOOSO3H). This is used in the form of its potassium triple salt, containing potassium sulfate and bisulfate. It is employed in batch processes at elevated temperatures, because it reacts more slowly with wool than chlorine. The process sequence is similar to that used for chlorine-based treatments. It involves degradative oxidation with PMS, followed by neutralization with sodium sulfite and then application of a resin. Unlike chlorine, however, PMS does not remove the bound lipid or oxidize cystine to cysteic acid. The main product of the reaction is cystine sulfonic acid or Bunte salt groups.

    Plasma Treatment in SR wool
    There is an enormous potential in the plasma treatment of natural fibre fabrics. Plasma treatment has proved to be successful in the shrink-resist treatment of wool with a simultaneously positive effect on the dyeing and printing.

    Additive Shrink-Resist Treatments
    The principal additive shrink-resist treatment for wool fabrics uses the polymer Synthappret BAP (Bayer AG). This is a poly(propylene oxide) polyurethane, containing reactive carbamoyl sulfonate (bisulfite adducts of isocyanate) groups, ie NHCOSO3 − Na+. An aqueous solution of this polymer is padded onto woven fabrics. The polymer cross-links on drying to form flexible linkages between fibers and yarns . Other polymers may be applied at the same time to modify the handle. 

    Introduction of Wool | Bleaching Process of Wool | Bleaching Method ofWool Fiber/Fabrics

    Posted at  14:02  |  in  regular  |  Continue lendo ...»

    Introduction of Wool
    Wool exhibits by nature a pronounced yellow color and also on exposure to light , alkali or by microbial degradation. Commercially, wool bleaching is carried out using either an oxidative or a reductive system, or a combined oxidation/reduction process. Oxidative bleaching in the dyebath is also possible .

    In general, oxidative bleaching with hydrogen peroxide gives superior whiteness over reductive methods..Recent research also revealed the use enzymes to enhance the whiteness of bleached wool.

    Wool cannot be bleached with sodium hypochlorite solutions, as for cotton, since it is extensively damaged to the point at which it even dissolves in the solution.

    Oxidative Bleaching Method
    A batch treatment with hydrogen peroxide is used for most bleaching applications.An activator (eg an alkali) is normally added to increase the rate of bleaching. Typically, wool is bleached at pH 8–9 for 1 h at 60◦C with a stabilized solution of hydrogen peroxide (0.75% w/w). It is generally accepted that, under alkaline conditions, the active bleaching species is the perhydroxy anion (OOH− ), the formation of which is encouraged by higher pH .

    Peroxide bleaching of wool under mild acidic conditions (pH 5–6) can also be carried out using a peracid activator such as Prestogen W (BASF) or citric acid . As wool sustains some damage in the presence of alkali, this method is useful for bleaching delicate fabrics.

    An undesirable side effect is the rapid decomposition of hydrogen peroxide to water and oxygen, a reaction catalyzed by transition-metal ions. A stabilizer, which sequesters these ions, is used to prevent this side reaction occurring. The most common stabilizers for alkaline wool bleaching are phosphates, particularly tetrasodium pyrophosphate. However, recent concerns over phosphates in effluents from textile treatment have led to the development of alternative stabilizers based on silicates .

    Heavily pigmented fibers, such as Karakul wools, require a more severe approach known as mordant bleaching. In this method, the wool is treated with a metal salt and then with hydrogen peroxide. In the first step, the melanin pigment in the wool preferentially absorbs the metal cations; and in the second step, the cations catalytically decompose the peroxide to produce highly aggressive hydroxyl free radicals, which selectively attack and bleach the melanin.

    Reductive Bleaching
    The two most popular chemicals used for reductive bleaching of wool are stabilized sodium dithionite and thiourea dioxide. Most reductive bleaching of wool is carried out using stabilized dithionite (2–5g/L) at pH 5.5–6 and 45–65◦C for 1 h. Thiourea dioxide is more expensive than sodium dithionite, but is an effective bleach when applied (1–3 g/L) at 80◦C and pH 7 for 1 h. Whiter fabrics are produced when oxidative bleaching is followed by a reductive process—this is often referred to as “full bleaching.”

    Reductive Bleaching with Sulfur Dioxide
    In the early days sulfur dioxide was used to bleach wool , but disadvantage of this method of bleaching wool was that the white was not permanent when exposed to sun and air.

    Disadvantage of reductive bleaching with hydro
    1.It tends to part harsh handle to wool.
    2.Reducing agents tend to break cystine cross links in protien fibers.

    Full Bleaching Of Wool
    However, with even the best oxidative bleaching processes, there is a limit to the whiteness that may be achieved on wool, within the limits of acceptable fibre damage.Whiter fabrics are produced when oxidative bleaching is followed by a reductive process(combined oxidative/reductive bleaching treatments)—this is often referred to as “full bleaching.”

    Shrink Resistance Treatment of Wool
    Felting in garments and fabrics that leads to excessive shrinkage is, however, undesirable. It occurs when the wet material is subjected to severe mechanical action, for example, in laundering or tumble drying . Shrink-resist treatments are directed at preventing felting shrinkage, whereas minimization of relaxation shrinkage requires careful control during fabric finishing.

    The term shrink-resistant is preferred to “shrinkproofed,Shrink resist treatment of wool adds consumer desired properties to this superior natural fibre, the improved processing technology allows processors and retailers to offer fabrics and garments with added value and performance. The improved performance offered by the Total Easy Care range of processes includes machine washability and tumble dry qualities.

    Principle of SR Treatment
    A variety of methods produce wool fabrics that withstand repeated washing without shrinkage and felting. They are particularly important for knitted woollens and worsted fabrics. 
    Two main principles are used:
    (1) modification of the scale structure of the fibre cuticle to decrease the directional friction effect – this can be achieved by chemical treatments that either partially remove the scales or cover them with a smooth film of polymer;

    (2) reduction of fibre mobility by adhesion of fibres and yarns at their points of contact and by decreasing fibre elasticity by means of intermolecular crosslinking.

    Chlorine SR Treatment
    Chlorine-Based Shrink-Resist Treatments. The principal oxidizing agent used in degradative shrink-resist treatments is chlorine. Free chlorine reacts very rapidly with wool; hence, it is difficult to treat a mass of wool fibers evenly. Two different types of chlorination methods are used commercially: continuous treatment and batch treatment. In the continuous method, top or loose wool is reacted with an aqueous solution of chlorine gas for a short time (
    Chlorine Free SR treatment
    Chlorine-Free Shrink-Resist Treatments. Commercially, the only other oxidizing agent used to any extent is permonosulfuric acid (PMS; HOOSO3H). This is used in the form of its potassium triple salt, containing potassium sulfate and bisulfate. It is employed in batch processes at elevated temperatures, because it reacts more slowly with wool than chlorine. The process sequence is similar to that used for chlorine-based treatments. It involves degradative oxidation with PMS, followed by neutralization with sodium sulfite and then application of a resin. Unlike chlorine, however, PMS does not remove the bound lipid or oxidize cystine to cysteic acid. The main product of the reaction is cystine sulfonic acid or Bunte salt groups.

    Plasma Treatment in SR wool
    There is an enormous potential in the plasma treatment of natural fibre fabrics. Plasma treatment has proved to be successful in the shrink-resist treatment of wool with a simultaneously positive effect on the dyeing and printing.

    Additive Shrink-Resist Treatments
    The principal additive shrink-resist treatment for wool fabrics uses the polymer Synthappret BAP (Bayer AG). This is a poly(propylene oxide) polyurethane, containing reactive carbamoyl sulfonate (bisulfite adducts of isocyanate) groups, ie NHCOSO3 − Na+. An aqueous solution of this polymer is padded onto woven fabrics. The polymer cross-links on drying to form flexible linkages between fibers and yarns . Other polymers may be applied at the same time to modify the handle. 

    Sunday, 4 March 2012

    Float Stitch
    A float stitch or welt stitch (Fig.A) is composed of a held loop, one or more float loops and knitted loops. It is produced when a needle (M) holding its old loop fails to receive the new yarn that passes, as a float loop, to the back of the needle and to the reverse side of the resultant stitch, joining together the two nearest needle loops knitted from it.
    Fig.A
    In Fig.B, the float stitch shows the missed yarn floating freely on the reverse side of the held loop. (This is the technical back of single-jersey structures but is the inside of rib and interlock structures.) The float extends from the base of one knitted or tucked loop to the next, and is notated either as an empty square or as a bypassed point. It is assumed that the held loop extends into the courses above until a knitted loop is indicated in that wale.
    Fig.B
    A single float stitch has the appearance of a U-shape on the reverse of the stitch. Structures incorporating float stitches tend to exhibit faint horizontal lines. Float stitch fabrics are narrower than equivalent all-knit fabrics because the wales are drawn closer together by the floats, thus reducing width-wise elasticity and improving fabric stability.

    The Tuck Stitch
    A tuck stitch is composed of a held loop, one or more tuck loops and knitted loops. It is produced when a needle holding its loop also receives the new loop, which becomes a tuck loop because it is not intermeshed through the old loop but is tucked in behind it on the reverse side of the stitch(Fig.C). Its side limbs are therefore not restricted at their feet by the head of an old loop, so they can open outwards towards the two adjoining needle loops formed in the same course. The tuck loop thus assumes an inverted V or U-shaped configuration. The yarn passes from the sinker loops to the head that is intermeshed with the new loop of a course above it, so that the head of the tuck is on the reverse of the stitch.

    Fig.C
    The tuck loop configuration can be produced by two different knitting sequences:

    1 By commencing knitting on a previously empty needle. As the needle was previously empty, there will be no loop in the wale to restrict the feet of the first loop to be knitted and, in fact, even the second loop tends to be wider than normal. The effect is clearly visible in the starting course of a welt. By introducing rib needles on a selective basis, an open-work pattern may be produced on a plain knit base.

    2 By holding the old loop and then accumulating one or more new loops in the needle hook. Each new loop becomes a tuck loop as it and the held loop are knocked-over together at a later knitting cycle and a new loop is intermeshed with them. This is the standard method of producing a tuck stitch in weft knitting.
    Successive Tucks and Floats on the Same Rib Needle
    Successive tucks on the same needle are placed on top of each other at the back of the head of the held loop and each, in turn, assumes a straighter and more horizontal appearance and theoretically requires less yarn. Under normal conditions, up to four successive tucks can be accumulated before tension causes yarn rupture or needle damage. The limit is affected by machine design, needle hook size, yarn count, elasticity and fabric take-down tension (Fig.D). 
    Fig.D :Successive tucks and floats on the same rib needle.

    What is Float Stitch/Tuck Stitch? | Successive Tucks and Floats on theSame Rib Needle

    Posted at  21:27  |  in  regular  |  Continue lendo ...»

    Float Stitch
    A float stitch or welt stitch (Fig.A) is composed of a held loop, one or more float loops and knitted loops. It is produced when a needle (M) holding its old loop fails to receive the new yarn that passes, as a float loop, to the back of the needle and to the reverse side of the resultant stitch, joining together the two nearest needle loops knitted from it.
    Fig.A
    In Fig.B, the float stitch shows the missed yarn floating freely on the reverse side of the held loop. (This is the technical back of single-jersey structures but is the inside of rib and interlock structures.) The float extends from the base of one knitted or tucked loop to the next, and is notated either as an empty square or as a bypassed point. It is assumed that the held loop extends into the courses above until a knitted loop is indicated in that wale.
    Fig.B
    A single float stitch has the appearance of a U-shape on the reverse of the stitch. Structures incorporating float stitches tend to exhibit faint horizontal lines. Float stitch fabrics are narrower than equivalent all-knit fabrics because the wales are drawn closer together by the floats, thus reducing width-wise elasticity and improving fabric stability.

    The Tuck Stitch
    A tuck stitch is composed of a held loop, one or more tuck loops and knitted loops. It is produced when a needle holding its loop also receives the new loop, which becomes a tuck loop because it is not intermeshed through the old loop but is tucked in behind it on the reverse side of the stitch(Fig.C). Its side limbs are therefore not restricted at their feet by the head of an old loop, so they can open outwards towards the two adjoining needle loops formed in the same course. The tuck loop thus assumes an inverted V or U-shaped configuration. The yarn passes from the sinker loops to the head that is intermeshed with the new loop of a course above it, so that the head of the tuck is on the reverse of the stitch.

    Fig.C
    The tuck loop configuration can be produced by two different knitting sequences:

    1 By commencing knitting on a previously empty needle. As the needle was previously empty, there will be no loop in the wale to restrict the feet of the first loop to be knitted and, in fact, even the second loop tends to be wider than normal. The effect is clearly visible in the starting course of a welt. By introducing rib needles on a selective basis, an open-work pattern may be produced on a plain knit base.

    2 By holding the old loop and then accumulating one or more new loops in the needle hook. Each new loop becomes a tuck loop as it and the held loop are knocked-over together at a later knitting cycle and a new loop is intermeshed with them. This is the standard method of producing a tuck stitch in weft knitting.
    Successive Tucks and Floats on the Same Rib Needle
    Successive tucks on the same needle are placed on top of each other at the back of the head of the held loop and each, in turn, assumes a straighter and more horizontal appearance and theoretically requires less yarn. Under normal conditions, up to four successive tucks can be accumulated before tension causes yarn rupture or needle damage. The limit is affected by machine design, needle hook size, yarn count, elasticity and fabric take-down tension (Fig.D). 
    Fig.D :Successive tucks and floats on the same rib needle.

    There are certain technical tests performedfor identifying various fibers. These tests require high technology laboratory equipment and are much more reliable than the non technical fibre tests.Technicals tests require high skilled personnel and technical know how of handling chemicals and their accurate analysis. These tests are very valuable for those fabrics that are a blend of different yarns and also have certain special properties including flame retardance etc.  

    TYPES OF TECHNICAL TEST
    1.  Microscopic test 
    2. Chemical test
    MICROSCOPIC TEST 
    1.  Microscopic test is a technical test that involves identifying the fabric with the help of a microscope with a magnification of minimum 100 power.
    2.  The test can easily distinguish between fibers.
    3. The test identifies the natural fibers more easily as compared to man made ones.
    4. Synthetic fibers are very similar in appearance and the increase in the number of varieties, makes it a little tough to distinguish the fibers even under a microscope.
    MICROSCOPIC TEST FOR NATURAL FIBERS

    COTTON:

    • It is a single elongated cell. Under the microscope, it resembles a collapsed, spirally twisted tube with a rough surface.
    •  The thin cell wall of the fiber has from 200 to 400 convolutions per inch.
    LINEN:
    • Under the microscope, the hair like flax fiber shows several sided cylindrical filaments with fine pointed ends.
    •  The fiber somewhat resembles a straight, smooth
    WOOL:

    • Under the microscope , wool’s cross section shows three layers- epidermis, cortex and the medulla.
    SILK:
    • It appears somewhat elliptical and triangular in cross section when we see under the microscope.
    • It is composed of fibroin, consisting of two filaments, called brin which is held together by sericin.
    MICROSCOPIC TEST FOR MANMADE FIBERS

    RAYONS:

    • Rayon fibers have a glasslike luster under the microscope and appear to have a uniform diameter when viewed longitudinally.
    ACETATE:
    •  The cross sectional view has a bulbous or multilobal appearance with indentations.
    •  These indentations appear as occasional markings or
    NYLON:

    •  The basic microscopic appearance is generally fine ,round, smooth, andtranslucent.
    •  It is also produced in multilobal cross-sectional types.
    POLYESTERS:
    •  Generally, polyester fibers are smooth and straight and the cross-section is round.
    •  This general characteristics may be altered to achieve certain characteristics, such
    ACRYLICS: The methods of manufacturing of the acrylic fibres differ, the appearances vary accordingly.
    •  ACRILAN ACRYLIC: It has a bean-shaped cross section, its longitudinal appearance is straight and smooth.
    •  ORLON ACRYLIC: It has a flat, nut-shaped cross section.
    •  CRESLAN ACRYLIC: It has an almost round cross section.
    •  MOD ACRYLICS: it is of two types verel modacrylic and SEF modacrylic
    SPANDEX: Spandex fibers are unique in appearance, they appear to be groups of fibersfused together.

    GLASS:
    The fiber is smooth, round, translucent, highly lustrous, and quite flexible.

    CHEMICAL TESTS

    •  Chemical tests are another technical means of identifying fibers. But chemical tests are not intended for the general consumers.
    •  Different types of chemical tests are undertaken to establish the identity of the fibers used.
    •  These tests give accurate and precise analysis.
    •  The tests are conducted in research laboratories.
    TYPES OF CHEMICAL TEST

    Stain Test:
    Also known as the Double Barrel Fibre Identification (DBFI), the test is based on the theory that each fibre has its own distinct two- colour reaction when treated with stain.

    A fibre will turn to a particular colour in the presence of dilute acetic acid and to some other specific colour when stained in the presence of a mild alkali.

    Solvent Test:
    The test involves treating the fibres in certain solvents for identifying them. The technical test is becoming difficult to conduct as most of the manufactured fibres and their blends are chemically similar. There is no individual chemical or solvent test for separating or identifying the fibres in combinations

    This technical fibre identification test has the following
    advantages and limitations

    Advantages
    • More reliable than the non technical tests.
    • Used for both man made fibres and natural fibres.
    • Easily conducted.

    Limitations
    • Certain manufacturing and finishing processes like mercerizing, affects the appearance of the fibres under the microscope.
    • Very dark coloured fabrics cannot be identified under microscope.
    • Dye stuffs must be removed from fabrics.

    Microscopic Test for Natural Fiber | Microscopic Test for Manmade Fiber| Chemical Test for Textile Fiber

    Posted at  17:39  |  in  TTQC  |  Continue lendo ...»

    There are certain technical tests performedfor identifying various fibers. These tests require high technology laboratory equipment and are much more reliable than the non technical fibre tests.Technicals tests require high skilled personnel and technical know how of handling chemicals and their accurate analysis. These tests are very valuable for those fabrics that are a blend of different yarns and also have certain special properties including flame retardance etc.  

    TYPES OF TECHNICAL TEST
    1.  Microscopic test 
    2. Chemical test
    MICROSCOPIC TEST 
    1.  Microscopic test is a technical test that involves identifying the fabric with the help of a microscope with a magnification of minimum 100 power.
    2.  The test can easily distinguish between fibers.
    3. The test identifies the natural fibers more easily as compared to man made ones.
    4. Synthetic fibers are very similar in appearance and the increase in the number of varieties, makes it a little tough to distinguish the fibers even under a microscope.
    MICROSCOPIC TEST FOR NATURAL FIBERS

    COTTON:

    • It is a single elongated cell. Under the microscope, it resembles a collapsed, spirally twisted tube with a rough surface.
    •  The thin cell wall of the fiber has from 200 to 400 convolutions per inch.
    LINEN:
    • Under the microscope, the hair like flax fiber shows several sided cylindrical filaments with fine pointed ends.
    •  The fiber somewhat resembles a straight, smooth
    WOOL:

    • Under the microscope , wool’s cross section shows three layers- epidermis, cortex and the medulla.
    SILK:
    • It appears somewhat elliptical and triangular in cross section when we see under the microscope.
    • It is composed of fibroin, consisting of two filaments, called brin which is held together by sericin.
    MICROSCOPIC TEST FOR MANMADE FIBERS

    RAYONS:

    • Rayon fibers have a glasslike luster under the microscope and appear to have a uniform diameter when viewed longitudinally.
    ACETATE:
    •  The cross sectional view has a bulbous or multilobal appearance with indentations.
    •  These indentations appear as occasional markings or
    NYLON:

    •  The basic microscopic appearance is generally fine ,round, smooth, andtranslucent.
    •  It is also produced in multilobal cross-sectional types.
    POLYESTERS:
    •  Generally, polyester fibers are smooth and straight and the cross-section is round.
    •  This general characteristics may be altered to achieve certain characteristics, such
    ACRYLICS: The methods of manufacturing of the acrylic fibres differ, the appearances vary accordingly.
    •  ACRILAN ACRYLIC: It has a bean-shaped cross section, its longitudinal appearance is straight and smooth.
    •  ORLON ACRYLIC: It has a flat, nut-shaped cross section.
    •  CRESLAN ACRYLIC: It has an almost round cross section.
    •  MOD ACRYLICS: it is of two types verel modacrylic and SEF modacrylic
    SPANDEX: Spandex fibers are unique in appearance, they appear to be groups of fibersfused together.

    GLASS:
    The fiber is smooth, round, translucent, highly lustrous, and quite flexible.

    CHEMICAL TESTS

    •  Chemical tests are another technical means of identifying fibers. But chemical tests are not intended for the general consumers.
    •  Different types of chemical tests are undertaken to establish the identity of the fibers used.
    •  These tests give accurate and precise analysis.
    •  The tests are conducted in research laboratories.
    TYPES OF CHEMICAL TEST

    Stain Test:
    Also known as the Double Barrel Fibre Identification (DBFI), the test is based on the theory that each fibre has its own distinct two- colour reaction when treated with stain.

    A fibre will turn to a particular colour in the presence of dilute acetic acid and to some other specific colour when stained in the presence of a mild alkali.

    Solvent Test:
    The test involves treating the fibres in certain solvents for identifying them. The technical test is becoming difficult to conduct as most of the manufactured fibres and their blends are chemically similar. There is no individual chemical or solvent test for separating or identifying the fibres in combinations

    This technical fibre identification test has the following
    advantages and limitations

    Advantages
    • More reliable than the non technical tests.
    • Used for both man made fibres and natural fibres.
    • Easily conducted.

    Limitations
    • Certain manufacturing and finishing processes like mercerizing, affects the appearance of the fibres under the microscope.
    • Very dark coloured fabrics cannot be identified under microscope.
    • Dye stuffs must be removed from fabrics.

    The machines used for the manufacturing of knit fabrics can be divided into machines with individually driven needles and needle bar machines. The former type of machine incorporates needles which are moved individually by cams acting on the needle butt; they are used for producing weft knits and are subdivided into circular knitting machines and flat-bed knitting machines.

    The needles used can be latch needles or compound needles. The needle bar machines incorporate needles which move simultaneously, since they are all fixed to the same bar; we distinguish full-fashioned knitting machines and circular loop-wheel machines for the production of weft knit fabrics, which only use spring-beard needles, and warp knitting machines which use spring-beard needles, latch needles and compound needles.
    Classification of Knitting Machines

    Introduction of Knitting Machines | Classification of Knitting Machines

    Posted at  13:48  |  in  regular  |  Continue lendo ...»

    The machines used for the manufacturing of knit fabrics can be divided into machines with individually driven needles and needle bar machines. The former type of machine incorporates needles which are moved individually by cams acting on the needle butt; they are used for producing weft knits and are subdivided into circular knitting machines and flat-bed knitting machines.

    The needles used can be latch needles or compound needles. The needle bar machines incorporate needles which move simultaneously, since they are all fixed to the same bar; we distinguish full-fashioned knitting machines and circular loop-wheel machines for the production of weft knit fabrics, which only use spring-beard needles, and warp knitting machines which use spring-beard needles, latch needles and compound needles.
    Classification of Knitting Machines

    Experiment name: Analysis of woven fabric. (Sateen)

    Object:
    1. To know about the structure of fabric.
    2. To know about the raw material of fabric.
    3. To produce exactly the similar fabric.

    Sample: 

    Apparatus:
    1. Counting glass,
    2. Needle,
    3. Beesleys balance,
    4. Twist tester,
    5. GSM cutter,
    6. Graph paper.

    Analysis Sateen Fabric: 


    1. Weave plan: In graph the gaps between the lines are considered according to X axis as weft  threads and according to Y axis as warp threads. The up threads are indicated by filling up the gaps and down threads without filling up the gaps.

    2. Drafting plan: According to British system drafting plan is drawn at the top of weave plan. Here broken draft is used to draft the plan.

    3. Lifting plan: The lifting plan is drawn at the right side of the weave plan.

    4. Face side and backside: The face side and back side are not same.

    5. Direction of warp and weft: Direction of both warp and weft are indicated by arrow marks by the side of the sample.

    6. Raw material: Both warp and weft yarns are filament. 


    7. Thread density:
    No. of reading
    EPI
    Average
    PPI
    Average
    1
    44
    45
    42
    41
    2
    45
    39
    3
    46
    40
    4
    43
    43
    5
    47
    41

    8. Yarn count:
    No. of reading
    Warp count
    Average
    Weft count
    Average
    1
    20


    21
    19


    21
    2
    22
    23
    3
    23
    20
    4
    21
    22
    5
    19
    21

    9. Yarn twist:
    No. of reading
    Warp twist
    Average
    Weft twist
    Average
    1
    X


    X
    X


    X
    2
    X
    X
    3
    X
    X
    4
    X
    X
    5
    X
    X

    10. Direction of twist: As the yarns are filament so they have no twist.

    11. Design of fabric: As it is a derivative of twill so it has no formula number.

    12. GSM calculation: By GSM cutter we get the GSM of fabric is 130 gm/meter2.

    13. Repeat size: The repeat size of this fabric is 24X24.

    14. Type of loom: Dobby loom is used to produce this fabric.

    End Use: This type of fabric is very much used for making towel, bed sheet, pillow, table cloth etc.

    Conclusion: 
    Analysis of fabric structure is very essential to know about the fabric. Because it gives all kinds of information about the fabric that is needed to reproduce or to change structure or design of fabric. By this practical I learn how to analyse primarily a simple plain structure of woven fabric. Further I will learn more complex fabric analysis. But this basic structure analysis will be very much helpful not only to analyse those but also in my future career.

    Analysis of Fabric | Analysis of Sateen Woven Fabric Stracture

    Posted at  02:36  |  in  regular  |  Continue lendo ...»

    Experiment name: Analysis of woven fabric. (Sateen)

    Object:
    1. To know about the structure of fabric.
    2. To know about the raw material of fabric.
    3. To produce exactly the similar fabric.

    Sample: 

    Apparatus:
    1. Counting glass,
    2. Needle,
    3. Beesleys balance,
    4. Twist tester,
    5. GSM cutter,
    6. Graph paper.

    Analysis Sateen Fabric: 


    1. Weave plan: In graph the gaps between the lines are considered according to X axis as weft  threads and according to Y axis as warp threads. The up threads are indicated by filling up the gaps and down threads without filling up the gaps.

    2. Drafting plan: According to British system drafting plan is drawn at the top of weave plan. Here broken draft is used to draft the plan.

    3. Lifting plan: The lifting plan is drawn at the right side of the weave plan.

    4. Face side and backside: The face side and back side are not same.

    5. Direction of warp and weft: Direction of both warp and weft are indicated by arrow marks by the side of the sample.

    6. Raw material: Both warp and weft yarns are filament. 


    7. Thread density:
    No. of reading
    EPI
    Average
    PPI
    Average
    1
    44
    45
    42
    41
    2
    45
    39
    3
    46
    40
    4
    43
    43
    5
    47
    41

    8. Yarn count:
    No. of reading
    Warp count
    Average
    Weft count
    Average
    1
    20


    21
    19


    21
    2
    22
    23
    3
    23
    20
    4
    21
    22
    5
    19
    21

    9. Yarn twist:
    No. of reading
    Warp twist
    Average
    Weft twist
    Average
    1
    X


    X
    X


    X
    2
    X
    X
    3
    X
    X
    4
    X
    X
    5
    X
    X

    10. Direction of twist: As the yarns are filament so they have no twist.

    11. Design of fabric: As it is a derivative of twill so it has no formula number.

    12. GSM calculation: By GSM cutter we get the GSM of fabric is 130 gm/meter2.

    13. Repeat size: The repeat size of this fabric is 24X24.

    14. Type of loom: Dobby loom is used to produce this fabric.

    End Use: This type of fabric is very much used for making towel, bed sheet, pillow, table cloth etc.

    Conclusion: 
    Analysis of fabric structure is very essential to know about the fabric. Because it gives all kinds of information about the fabric that is needed to reproduce or to change structure or design of fabric. By this practical I learn how to analyse primarily a simple plain structure of woven fabric. Further I will learn more complex fabric analysis. But this basic structure analysis will be very much helpful not only to analyse those but also in my future career.

    Super Ofertas

    --
    Copyright © 2013 fibres2fashion. Blogger Template by BloggerTheme9
    Proudly Powered by Blogger.
    back to top